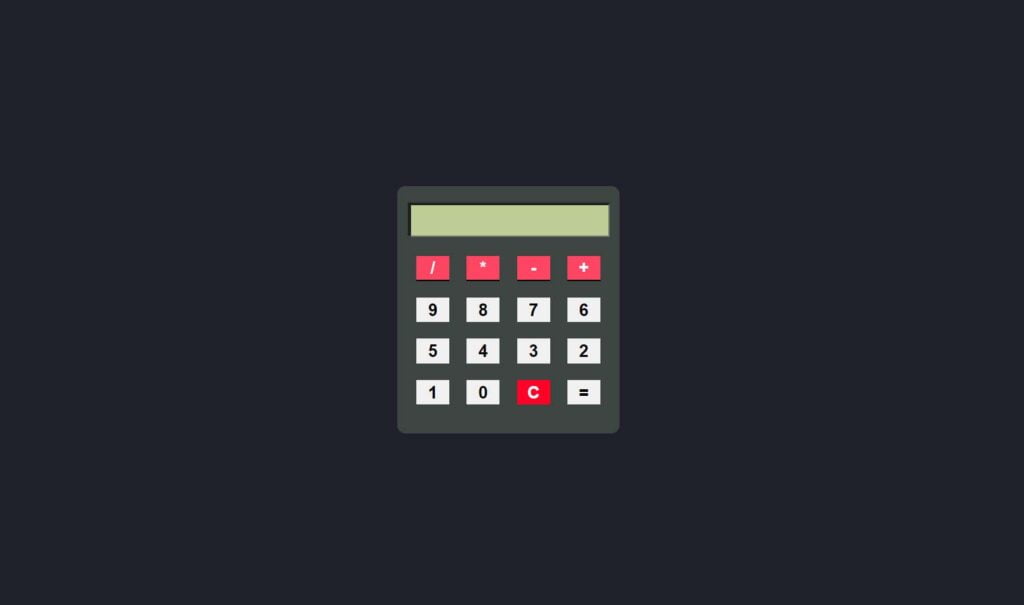
In this blog building a JavaScript Calculator, we will guide you through the process of creating a simple calculator using JavaScript. Calculators are a common beginner’s project and a great way to enhance your JavaScript skills. By the end of this tutorial, you’ll have a basic calculator that can perform addition, subtraction, multiplication, and division operations.
Building a JavaScript Calculator
Creating a JavaScript calculator is an excellent way to hone your programming skills and showcase your understanding of web development. A calculator is a versatile tool that performs various mathematical operations, providing a practical application for your JavaScript knowledge. Follow these steps to build your own calculator project:
- HTML Structure: Start by setting up the HTML structure. Use buttons for numbers, operators, and other functionalities. Include an input field to display the current calculation and results.
- CSS Styling: Add CSS styling to make your calculator visually appealing and user-friendly. Customize the colors, fonts, and layout to create an attractive design.
- Event Handling: Use JavaScript to handle button clicks. Attach event listeners to each button, capturing the user’s input and displaying it on the calculator’s input field.
- Implementing Operations: Create JavaScript functions to perform basic arithmetic operations like addition, subtraction, multiplication, and division. Ensure your calculator can handle multiple operations and maintain the correct order of operations.
- Handling Edge Cases: Account for edge cases like dividing by zero or handling large numbers. Add error messages or restrictions to prevent unexpected results.
- Clear and Equal Buttons: Implement the clear button to reset the calculator, and the equal button to evaluate the input expression and display the result.
- Extra Features (Optional): To enhance your project, consider adding features like decimal points, square roots, percentage calculations, or memory functions.
- Testing: Thoroughly test your calculator with various scenarios to ensure it performs accurately and consistently.
Table of JavaScript Calculator Project
Prerequisites:
Before you begin, ensure that you have a basic understanding of HTML, CSS, and JavaScript concepts. Familiarity with functions, variables, and event handling in JavaScript will be beneficial.
Step 1: Setting Up the HTML
- Create a new HTML file or use an existing one for your calculator project.
- Set up the basic structure of the calculator using HTML elements like <div>, <button>, and <input>. Create buttons for numbers (0-9), decimal point, operators (+, -, *, /), and a result display area.
 <div class="calculator">
    <div class="display">
      <form>
        <input type="text" value="" class="screen" size="18" >
      </form>
    </div>
    <div class="buttons">
      <button type="button" class=" button pink" value="/" data-num="/"> / </button>
      <button type="button" class=" button pink" value="*" data-num="*">*</button>
      <button type="button" class=" button pink" value="-" data-num="-">-</button>
      <button type="button" class=" button pink" value="+" data-num="+">+</button>
      <button type="button" class=" button" value="9" data-num="9">9</button>
      <button type="button" class=" button" value="8" data-num="8">8</button>
      <button type="button" class=" button" value="7" data-num="7">7</button>
      <button type="button" class=" button" value="6" data-num="6">6</button>
      <button type="button" class=" button" value="5" data-num="5">5</button>
      <button type="button" class=" button" value="4" data-num="4">4</button>
      <button type="button" class=" button" value="3" data-num="3">3</button>
      <button type="button" class=" button" value="2" data-num="2">2</button>
      <button type="button" class=" button" value="1" data-num="1">1</button>
      <button type="button" class=" button" value="0" data-num="0">0</button>
      <button type="button" class=" btn-clear" value="C" date-num="c">C</button>
      <button type="button" class=" btn-equal" value="=" date-num="=">=</button>
    </div>
  </div>
Step 2: Styling the Calculator
- If you want to add some flair to your calculator, create a CSS file or style section in your HTML to give it a visually appealing look.
- You can customize the size, color, font, and layout of the calculator to your liking.
body {
  background-color: #1f2029;
  font-family: Georgia, "Times New Roman", Times, serif;
  font-weight: 600;
  height: 100vh;
  display: flex;
  align-items: center;
  justify-content: center;
}

.calculator {
  background-color: #3d4543;
  height: 300px;
  width: 270px;
  border-radius: 10px;
  position: relative;
}

.calculator form {
  width: 100%;
}

.display {
  background-color: #222;
  width: 244px;
  position: relative;
  margin: 20px auto 0;
}

.display input {
  position: relative;
  left: 2px;
  top: 2px;
  height: 35px;
  background-color: #bccd95;
  font-size: 21px;
  text-align: right;
}

.buttons {
  position: relative;
  top: 15px;
  display: flex;
  flex-wrap: wrap;
  justify-content: space-between;
  width: 90%;
  margin: 0 auto;
}

.button,
.btn-equal,
.btn-clear {
  width: 40px;
  height: 30px;
  border: none;
  margin: 10px;
  border-top: 2px solid transparent;
  display: flex;
  align-items: center;
  justify-content: center;
  cursor: pointer;
      font-size: 21px;
    font-weight: 600;
}
.button.pink {
  color: #fff;
  background-color: #ff4561;
  border-bottom: black 2px solid;
}
.btn-clear {
  color: #fff;
  background-color: #ff0026;

}
Step 3: Handling Button Clicks with JavaScript for JavaScript Calculator
- In your HTML file, link the JavaScript file or include a <script> section at the end of the body to write your JavaScript code for JavaScript Calculator.
- Create a JavaScript function to handle button clicks for JavaScript Calculator. You can use the onclick event handler for each button.
- Inside the button click function, use the DOM (Document Object Model) to fetch the clicked button’s value and display it on the calculator’s display area.
Step 4: Implementing Basic Calculations
Set up variables to store the input numbers, operator, and the result.
Create functions for addition, subtraction, multiplication, and division to perform the respective calculations using the stored values.
Make sure to handle cases where the user clicks on the "=" button to calculate and display the final result.
(function () {
let screen = document.querySelector(".screen");
let buttons = document.querySelectorAll(".button");
let clear = document.querySelector(".btn-clear");
let equal = document.querySelector(".btn-equal");
buttons.forEach(function (button) {
button.addEventListener("click", function (e) {
let value = e.target.dataset.num;
screen.value += value;
console.log(screen.value);
});
});
equal.addEventListener("click", function (e) {
if (screen.value === "") {
screen.value = "";
} else {
let answer = eval(screen.value);
screen.value = answer;
}
});
clear.addEventListener("click", function (e) {
screen.value = "";
});
})();
const a = [1, 2, 3];
const b = [...a];
console.log(a >= b);
console.log(b);
console.log(a);Conclusion:
Congratulations! You have successfully built a basic calculator using JavaScript. This project provides a solid foundation for further enhancing your skills by adding more advanced features, such as square root, exponentiation, memory functions, or scientific operations.
Remember to experiment and improve your calculator’s functionality and design as you continue to learn and explore the world of JavaScript development! Happy coding!


