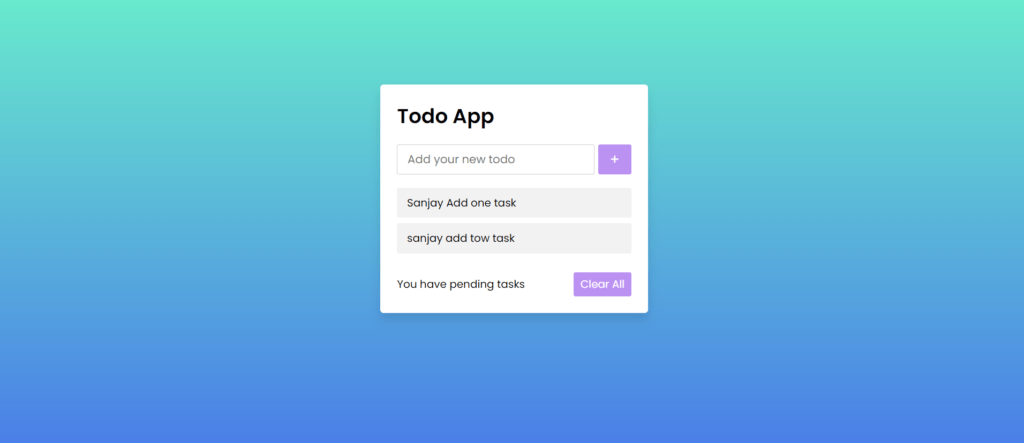
Staying organized is crucial for productivity, and a todo list is a fantastic tool for keeping track of tasks. In this tutorial, we’ll walk you through creating a todo list from scratch using HTML, CSS, and JavaScript. Let’s dive in!
Prerequisites Todo List
Before we start coding, ensure you have the following:
- Basic understanding of HTML, CSS, and JavaScript.
- Text editor (e.g., Visual Studio Code, Sublime Text).
- Web browser (e.g., Google Chrome, Mozilla Firefox).
Step 1: Setting Up HTML Structure
Let’s begin by creating the HTML structure for our todo list:
<!DOCTYPE html>
<html lang="en">
<head>
  <meta charset="UTF-8">
  <meta name="viewport" content="width=device-width, initial-scale=1.0">
  <link rel="stylesheet" href="style.css">
  <title>Todo App</title>
</head>
<body>
  <div class="wrapper">
    <header>Todo App</header>
    <div class="inputField">
      <input type="text" id="inputBox" placeholder="Add your new todo">
      <button type="button" id="addbtn">+</button>
    </div>
    <ul class="todoList"></ul>
    <div class="footer">
      <span>You have <span class="pendingTasks"></span> pending tasks</span>
      <button id="clearbtn" class="clearAll">Clear All</button>
    </div>
  </div>
  <script src="index.js"></script>
</body>
</html>
Step 2: Styling with CSS
Next, let’s style our todo list to make it visually appealing. Create a file named style.css and add the following CSS code:
@import url('https://fonts.googleapis.com/css2?family=Poppins:wght@200;300;400;500;600;700&display=swap');
*{
  margin: 0;
  padding: 0;
  box-sizing: border-box;
  font-family: 'Poppins', sans-serif;
}
::selection{
  color: #ffff;
  background: rgb(142, 73, 232);
}
body{
  width: 100%;
  height: 100vh;
  /* overflow: hidden; */
  padding: 10px;
  background: linear-gradient(to bottom, #68EACC 0%, #497BE8 100%);
}
.wrapper{
  background: #fff;
  max-width: 400px;
  width: 100%;
  margin: 120px auto;
  padding: 25px;
  border-radius: 5px;
  box-shadow: 0px 10px 15px rgba(0,0,0,0.1);
}
.wrapper header{
  font-size: 30px;
  font-weight: 600;
}
.wrapper .inputField{
  margin: 20px 0;
  width: 100%;
  display: flex;
  height: 45px;
}
.inputField input{
  width: 85%;
  height: 100%;
  outline: none;
  border-radius: 3px;
  border: 1px solid #ccc;
  font-size: 17px;
  padding-left: 15px;
  transition: all 0.3s ease;
}
.inputField input:focus{
  border-color: #8E49E8;
}
.inputField button{
  width: 50px;
  height: 100%;
  border: none;
  color: #fff;
  margin-left: 5px;
  font-size: 21px;
  outline: none;
  background: #8E49E8;
  border-radius: 3px;
  opacity: 0.6;
  transition: all 0.3s ease;
  cursor: pointer;
}
.inputField button:hover,
.footer button:hover{
  background: #721ce3;
}
.inputField button.active{
  opacity: 1;
  pointer-events: auto;
}
.wrapper .todoList{
  max-height: 250px;
  overflow-y: auto;
}
.todoList li{
  position: relative;
  list-style: none;
  height: 45px;
  line-height: 45px;
  margin-bottom: 8px;
  background: #f2f2f2;
  border-radius: 3px;
  padding: 0 15px;
  cursor: default;
  overflow: hidden;
}
.todoList li .icon{
  position: absolute;
  right: 0px;
  top: 0;
  background: #e74c3c;
  width: 45px;
  text-align: center;
  color: #fff;
  border-radius: 0 3px 3px 0;
  cursor: pointer;
  transition: all 0.2s ease;
}
.todoList li:hover .icon{
  right: 0px;
}
.wrapper .footer{
  display: flex;
  width: 100%;
  margin-top: 20px;
  align-items: center;
  justify-content: space-between;
}
.footer button{
  padding: 6px 10px;
  border-radius: 3px;
  border: none;
  outline: none;
  color: #fff;
  font-weight: 400;
  font-size: 16px;
  margin-left: 5px;
  background: #8E49E8;
  cursor: pointer;
  user-select: none;
  opacity: 0.6;
  transition: all 0.3s ease;
}
.footer button.active{
  opacity: 1;
  pointer-events: auto;
}
Step 3: Implementing JavaScript Functionality
Now, let’s add JavaScript code to make our todo list interactive. Create a file named index.js and add the JavaScript code provided.
const inputValue = document.getElementById('inputBox');
const addbtn2 = document.getElementById('addbtn');
const todoList = document.querySelector('.todoList');
const clearbtn = document.getElementById('clearbtn');
const pendingTasks = document.querySelector('.pendingTasks');

let todos = JSON.parse(localStorage.getItem('todos')) || [];

console.log(todos);

// Render the todo list when the page is loaded
renderTodoList();

function updateLocalStorage() {
    localStorage.setItem('todos', JSON.stringify(todos));
}

addbtn2.addEventListener("click", function (e) {
    const inputBox = inputValue.value;
    if (inputBox.trim() !== '') {
        // todos.push(inputBox);
        if (selectedTaskIndex !== null) {
            todos[selectedTaskIndex] = inputBox;
            selectedTaskIndex = null;
        } else {
            todos.push(inputBox);
        }
        inputValue.value = '';
        renderTodoList();
        updateLocalStorage();
    }
});

clearbtn.addEventListener("click", function (e) {
    todos = [];
    renderTodoList();
    updateLocalStorage();
});

let selectedTaskIndex = null;

function renderTodoList() {
    todoList.innerHTML = "";
    todos.forEach(function (item, index) {
        const li = document.createElement("li");
        li.textContent = item;
        li.addEventListener("click", () => {
            selectedTaskIndex = (selectedTaskIndex === index) ? null : index;
            inputValue.value = (selectedTaskIndex !== null) ? item : '';
        });
        // Create delete button
        const deleteButton = document.createElement("div");
        deleteButton.textContent = "D";
        deleteButton.classList.add("icon"); // Add class to delete button
        deleteButton.addEventListener("click", function () {
            deleteTodoItem(index);
        });

        // Append delete button to the list item
        li.appendChild(deleteButton);
        todoList.appendChild(li);
    });
    totalTask()
}

// Function to delete todo item
function deleteTodoItem(index) {
    todos.splice(index, 1);
    renderTodoList();
    inputValue.value = '';
    updateLocalStorage(); // Update local storage
}


function totalTask() {
    const task = todos.length;
    pendingTasks.textContent = task;
}
Adding More Details
HTML Structure Explanation:
- We have a
.wrapperdiv that contains the entire todo list. - Inside the wrapper, there’s a header for the todo list title, an input field for adding new todos, a list to display todos, and a footer showing the number of pending tasks and a button to clear all tasks.
CSS Styling Details:
- We’re using the Poppins font from Google Fonts for a modern look.
- The wrapper is styled with a background color, box-shadow, and border-radius to give it a card-like appearance.
- Input fields, buttons, and list items are styled for consistency and aesthetics.
JavaScript Functionality Explanation:
- We’re using localStorage to store and retrieve todo items, ensuring persistence even after page refresh.
- Event listeners are added to the “Add” and “Clear All” buttons to handle user interactions.
- A function is created to render the todo list based on the items stored in localStorage.
- Additional details can be added, such as validation for empty todos or the ability to mark tasks as completed.
Conclusion
#javascript #todo #todoapp #todolist
You’ve successfully created a todo list using HTML, CSS, and JavaScript! Feel free to customize the design further or add more features to suit your needs. Happy organizing!
javascript todo todolist
